🎥 A guide to setting press snaps
Antonia MarinoIn this guide, learn the essentials of installing press snaps, covering everything from selecting the right size to mastering the setting technique.
Choosing the Right Snap Size:
- Line 24 is for heavier leathers over 5oz, or when a heavy duty snap is needed.
- Line 20 is for leather ranging from 3-6oz. Line 20 are the most popular snap for many projects.
- For leather under 2mm, consider using Glove snaps or Line 16/Sigma snaps.
To learn the differences between press snaps, read our blog post called A Guide To Picking The Right Press Snaps.
When you're ready to take the plunge, shop for press snaps and setters.
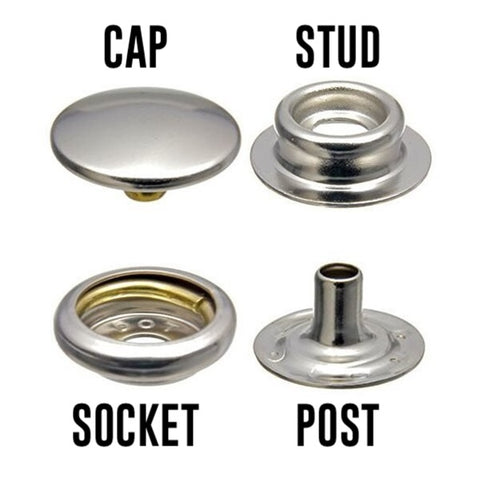
Understanding Snap Components:
Press snaps consist of four main parts: the cap, socket (female), post, and stud (male). Properly assembling these components ensures a strong and durable bond.
The cap is the front of the snap, and this fits with the socket.
The post is the flat underside of the snap, and this fits with the stud.
When fitted correctly, the stud will snap into the socket.
Hole Size Matters:

The size of the hole you create for your snap should not be larger than the size of the snap post to ensure a snug fit. You can use a 6 hole rotary punch (most have size 2-4.5mm holes), or single punches.
- Glove Snap: 2mm hole punch
- Sigma Snap: 2.5mm & 4mm hole punches
- Line 20: 2mm hole punch
- Line 24: 3.5mm hole punch
Buy round punches or rotary punches here.
Setting Press Snaps:
- Use an awl to mark the center before punching the hole to ensure proper alignment of your press snaps.
- Make sure you have snug fit for the posts. If your leather is soft, try a size smaller first.
- Ensure the snap post only protrudes about 1mm from the leather. If its too long the snap won't stay on your leather securely.
- Use a leather washer if the post is too long for your leather. Make this by cutting or punching a donut disc that is slightly smaller than the diameter of the stud.
- If the post is too short, skive out the underside of the leather for a secure fit. Use a leather skiver tool.
- Always use the correct size snap setters to ensure the post rolls down correctly, keeping the snap secure.
- When setting stainless steel snaps you will need a special snap setter tool.
- When setting the cap, use a snap anvil base with a concave divot to maintain the cap's shape.
- To ensure a proper bite, set snaps on a solid surface, like a marble slab or metal anvil. Place this on a sturdy table that does not bounce.
- Use a heavy rawhide or poly mallet.
- Tap the snap firmly a couple of times first, then tap in a rotating motion to allow the snap post to roll down effectively.