Upholstery Tip #1: K.I.S.S.
Antonia MarinoTip #1: Don't start with a wingback chair
Over thirty years ago I went headfirst into upholstery with a wingback chair. Bad mistake. I wish someone had said K.I.S.S to me back then!
Golden Tip: Don't start with a wingback chair!
I've retired from teaching upholstery now, but I used to tell my students: "Think of it like climbing stairs. It's quicker to walk up step by step than to jump straight to the top, right? Picture each step as a different project—start with a simple dining chair at the bottom and work your way up to the wingback at the top. The projects get progressively harder as you ascend. By completing them in this order, you'll learn the skills and finesse faster and be happier with your wingback in the end!'"
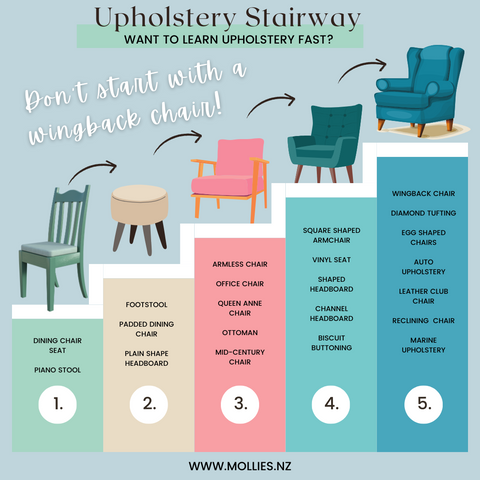 Dining chair seats with one piece of fabric, on a flat wooden base is your starting point. Here's why:
- You'll become familiar with support bases & various stuffing materials. All upholstery projects have at least these two elements!
- A single square shape is straightforward to work with. You can use the existing fabric as a pattern and add a stapling allowance
- It'll teach you how to get smooth, wrinkle-free fabric, which is an art in itself. Start with the opposite centers and work your way to the corners (we'll cover that concept another day).
- You'll have a great opportunity to hone your corner-folding techniques with simple ones! Hint: start with the back corners!
- Dining chairs often come in sets, providing multiple chances to practice and refine newfound skills. Repetition is key to mastering upholstery.
After you've learned to fix up your dining chairs, it's time to tackle the next challenge. Before you know it, you'll have mastered enough to proudly cover a wingback chair like a pro!
So grab your fabric, tools, and a set of dining chairs, and let the upholstery adventure begin! Happy Upholstering!